This guide is useful to train your own Microsoft AutoML translation model for customized MT using Microsoft Translator. For example, you can train a domain model, such as medical, legal, video games, financial reporting with your translation memory accumulated over the years. Alternatively, you can make an organization-specific model that knows all the product and people names, and follows your individual styles.
Unlike brands like Globalese, ModernMT and Systran, training Microsoft models is a technically complex task that requires some developer skills and knowledge. But with our guide a technically-savvy project manager or a solution architect on a language team can take on the ML operations.
If you’ve used the Google Cloud Platform before, each part of the training will just take:
- Creating an account: 10 to 15 minutes
- Creating a billing: 30+ minutes
- Training the model: 30+ minutes for the setup; 6+ hours for trainin
CREATING AN ACCOUNT
- Go to https://portal.azure.com/
- Create a new account.
TIP: You can use your Gmail to create an account on Microsoft Azure. You can also use your phone number instead. There are different sites for billings and models trainings. Don’t try to find everything in one place.
What it is: The Azure portal is a web-based, unified console that provides an alternative to command-line tools. With the Azure portal, you can manage your Azure subscription using a graphical user interface. You can build, manage, and monitor everything, from simple web apps to complex cloud deployments in the portal.
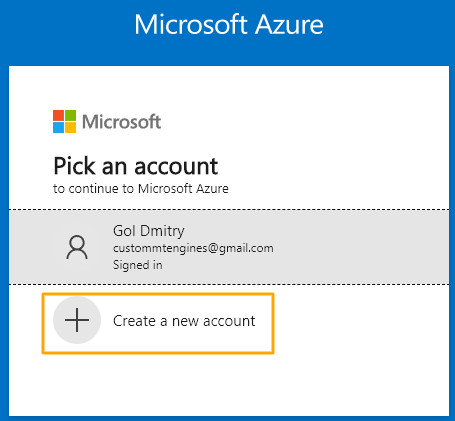
Follow the next simple steps to create an account.
CREATING A BILLING
- Go to https://portal.azure.com/
- Create a Subscription first.
TIP: To add a billing to the MS Azure portal, create a “Subscription” first, which contains that option. The structure is a bit different from what other providers have.
Also, you need an active “Subscription” to train the model as well.
This is the structure: Subscription > Recourse Groups > Translator (needed to train the model)
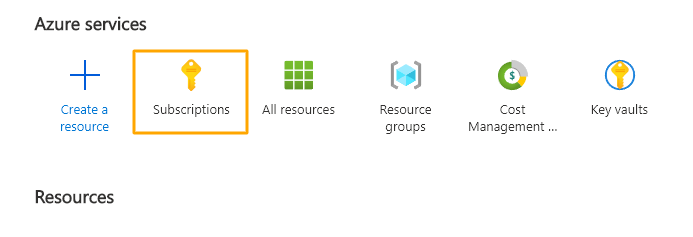
After that, create a new one and, for most cases, choose the “Pay as you go” subscription offer.

During the process, add your payment method as well.

- Go through all the steps and the account will be created.
TIP: Here’s another way to add your payment method.
Go to your current subscription and choose “Payment Methods”.
As part of the standard process, you’ll be asked to add a card and will receive phone notifications from your bank.
TIME: The verification process should not take long–it usually takes up to 2 minutes.

- The last thing is to create the Recourse Groups. This is where your Microsoft Translator will be stored.
What it is: A resource group is a container that holds related resources for an Azure solution. The resource group can include all the resources for the solution or only those you want to manage as a group.
- Go to Resource Groups and create a new one.

The most important step is to choose the Region where it’ll be stored. Choose your working region

TRAINING THE MODEL
Create Microsoft Translator
- Go to https://portal.azure.com/
- Go to “All resources “ and create new one.

<p>3. Search for “Translator” and pick the Microsoft Translator.
4. On the next page, click “Create”.
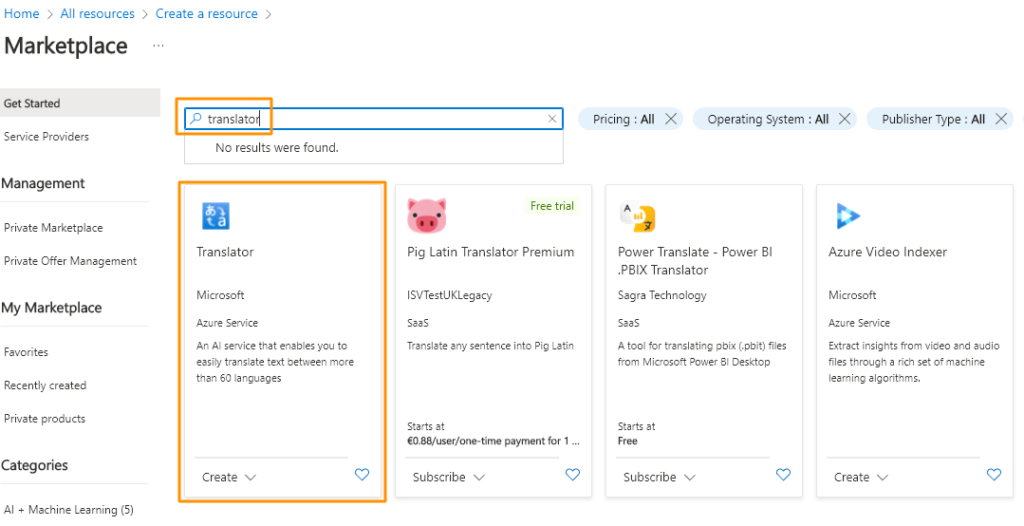
5. Fill all the forms your project requires.
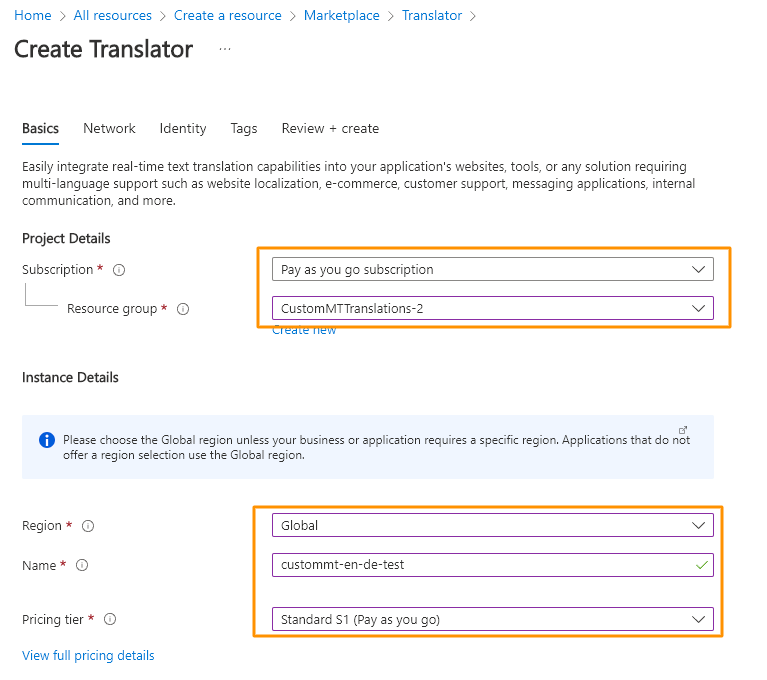
What it is: Translator, which is a part of Azure Cognitive Services, is a cloud-based machine translation service that can be used to build applications, websites, tools, or any solution requiring multi-language support. Built for business, Translator is a proven, customizable, and scalable technology for machine translation.
TIP: Here are the Subscription and the Resource groups we added earlier. Be aware of the region you set up for the Translator. It’ll be used later as well.
Execute Training
6. After, click the “Create and Review”, then select “Create”.
7. After the creation is complete, go to the resource.
TIME: Creating the Translator takes few seconds.

8. Go to “Keys and Endpoint”. Your API Keys will be stored here for later use.
TIP: You can use any of the two keys.
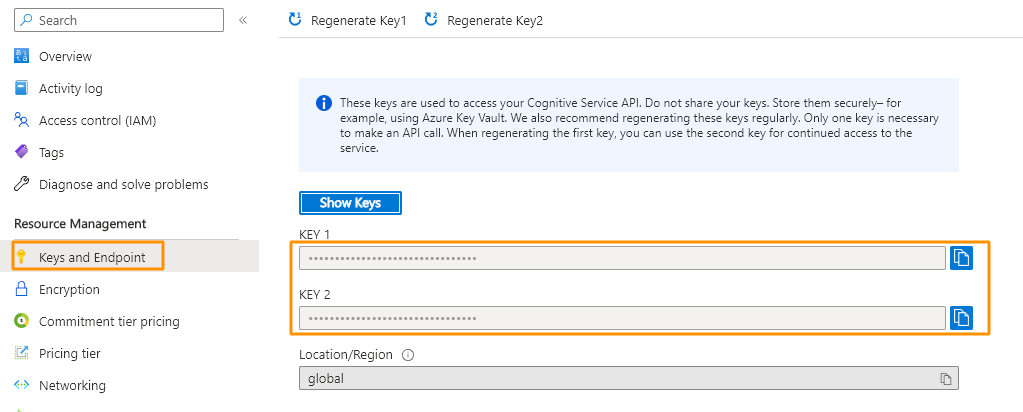
TIP: Use the second key to access options for making trained models.
9. Go to https://portal.customtranslator.azure.ai/
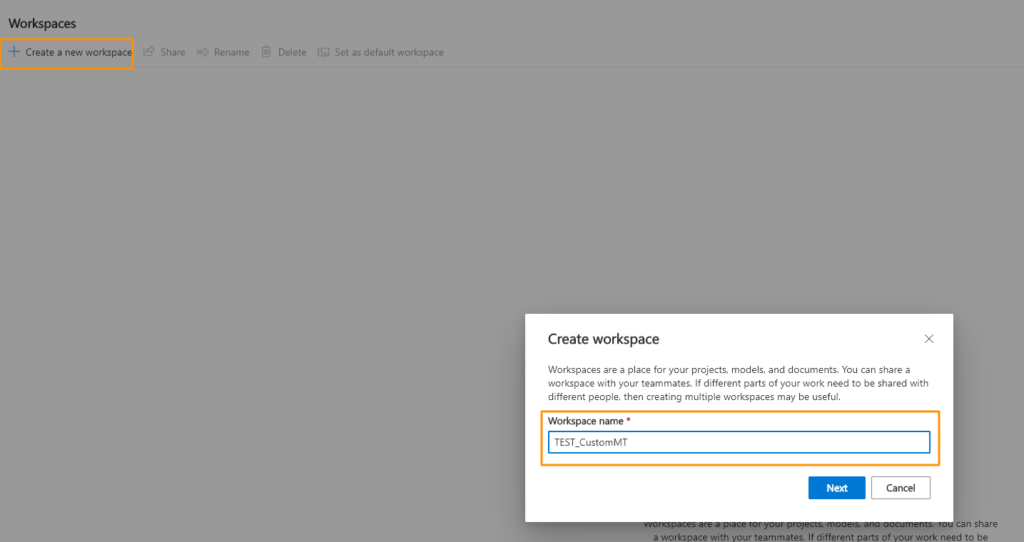
10. Create the “Workspace” and name it.
TIP: Workspace is a place where your data and model details will be stored.
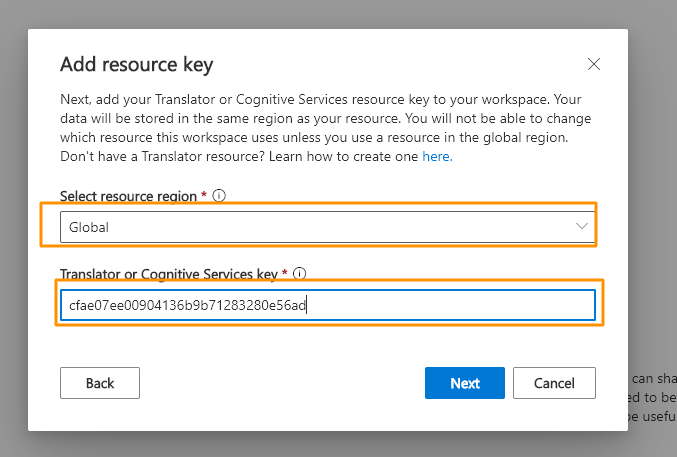
11. Select the needed Region and Put the API KEY that we made at Step 8.
12. Click button “Next”
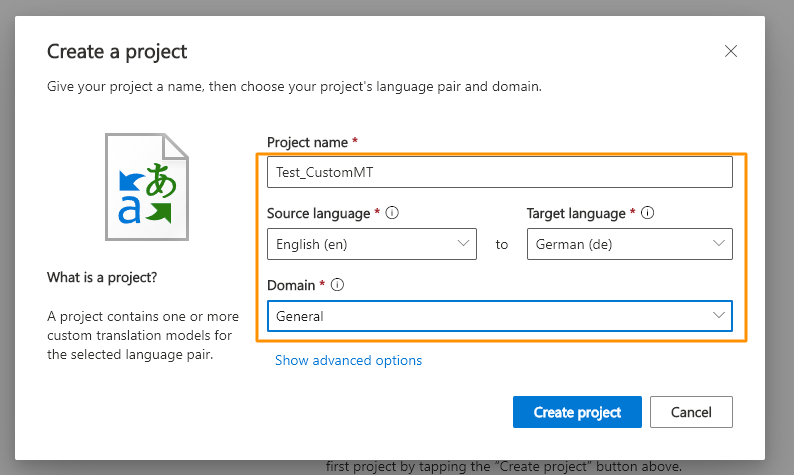
13 After, create a project and provide all the necessary details.
TIP: Choose the domain of your data theme. Otherwise, choose the “General” option.
As always, be aware of the region you choose.
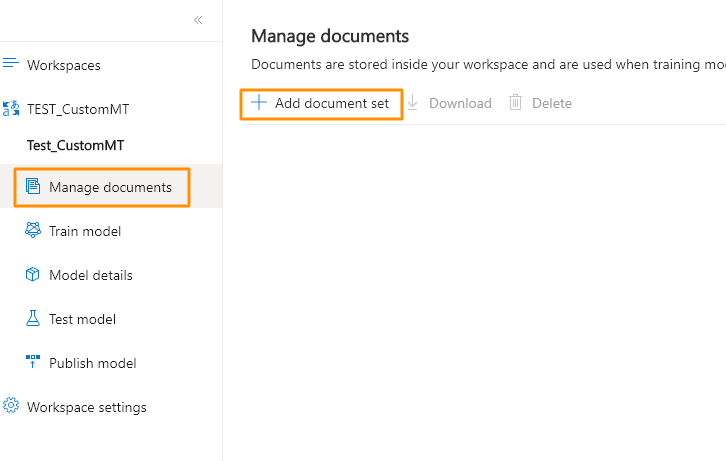
14. Go to the project and pick “Manage Documents” and “Add Document set”.
TIP: You can download uploaded TMX files (or any other) from this section.
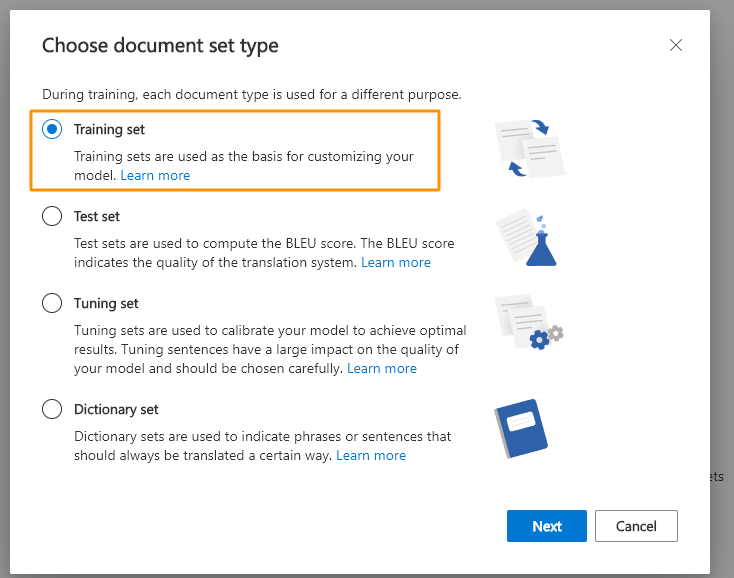
15. Choose the “Training set” and click the button “Next”
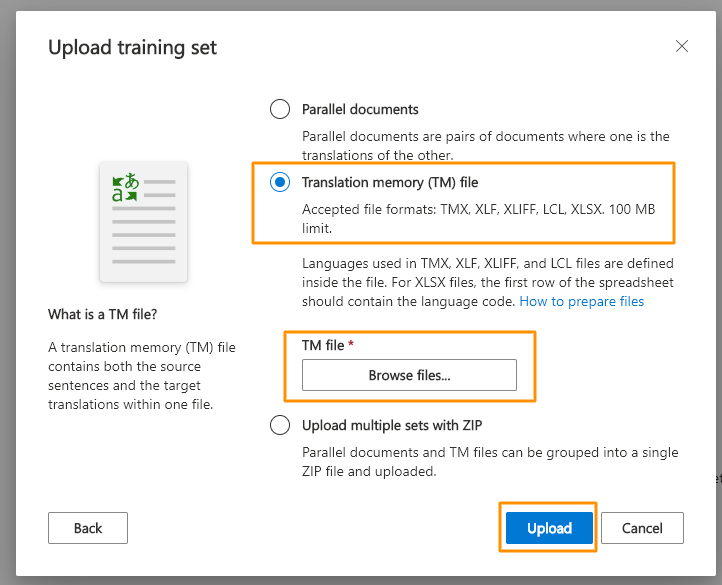
16. Choose the option you need and upload the file(s), up to 100 MB per one file.
TIP: Microsoft Training portal has a limit of 100 MB per file.You can easily separate a large dataset into small ones by application–for example, the Heartsome app.
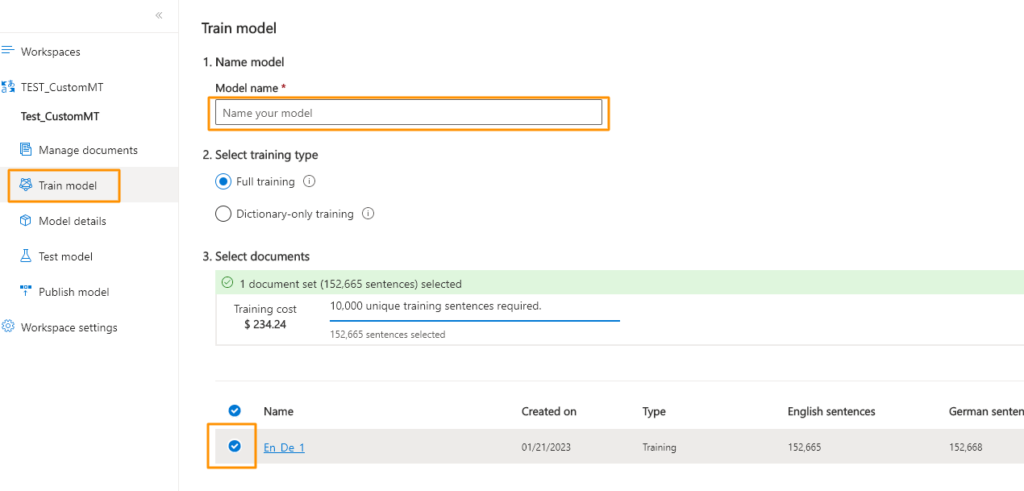
17. Once the upload is complete, go to “Train Model”, name your model, and check the training files.
TIP: Make sure everything is correct before starting the training. Check the language pair, billing, etc. Once training starts, it can no longer be cancelled and refunded.
18. Click the button “Train now”.
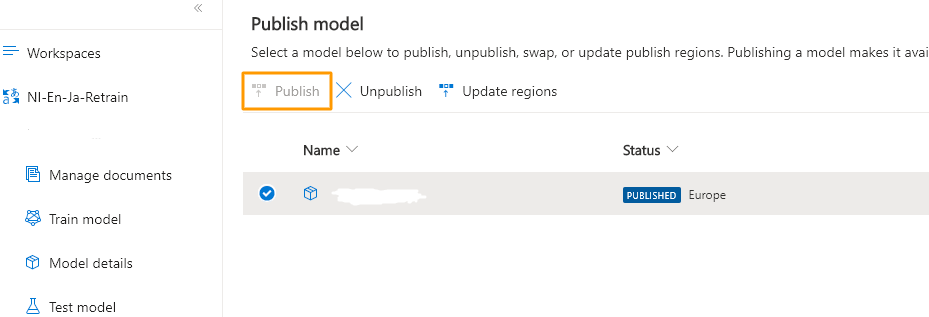
19. After the training is complete, go to “Publish Model”, choose the model currently trained, and click “Publish”. Choose the area to publish.
HOW TO USE CREDENTIALS
In case you need to use credentials to translate by CAT tools:most ask for the Azure Key (APY key) and Category of the trained Model.
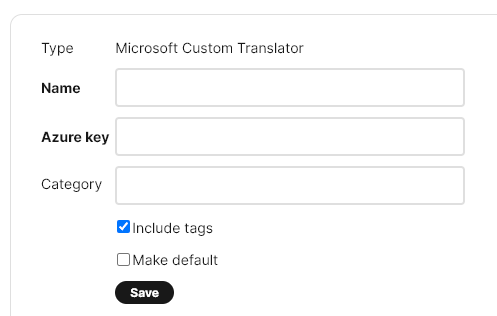
- The Azure Key or Api Key can be found in your Subscription > Key and Endpoint, as we showed in Step 8
- For each Category, go to the Portal translator, choose the needed model, and go to Model Details.


